|
Understanding Mailboxes
Mailboxes are used to send and receive e-mails via client based mail software and
can store mail on the hosting mail server.
Creating Mailboxes
To create mailboxes in addition to webmaster and postmaster mailboxes obligatory created on each maildomain:
- Click New E-mail on the maildomain Controls page:

- On the configuration page that you will be taken to, do the following:
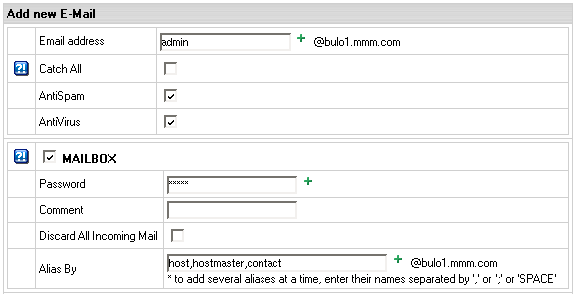
- Enter mailbox name in the Email address field.
- Check the Catch All box to collect email messages sent to a nonexistent account on the mail domain.
If Catch All isn't enabled on any mail resource running on the mailbox's mail domain, such email message will
bounce back to the sender with an error notification.
- AntiSpam: check this option to enable antispam filtering for your mailbox.
(Read about AntiSpam protection)
- AntiVirus: check this option to enable antivirus protection for your mailbox.
(Read about AntiVirus protection)
- Check the box next to MAILBOX and configure:
- Alias by: use this option for mass creation of mail aliases.
Enter alias names (without the @ part) separated by ',' or ';' or 'SPACE'.
Click the Submit button at the bottom of the form.
Agree with the charges, if any.
Removing Mailboxes
To remove a mailbox preserving other services running on this e-mail address:
- Click the mailbox e-mail address in the E-mail list on the maildomain Controls page:

- Uncheck MAILBOX.
- Click the Submit button at the bottom of the form.
To remove a mailbox with other mail services running on this e-mail address,
click the Trash icon in the mailbox Properites entry on the Mail Controls page:

Postmaster mailbox can't be deleted.
To delete a Catch All mailbox, first switch Catch All OFF.
Mailbox Storage Quota
Mailbox quota defines how many MB of mail you can store in your mailbox. You can't store more
than allowed by the mailbox quota. It is not included into the site disk space quota.
If your hosting plan allows, you can increase the initial free mailbox quota.
To increase mailbox quota:
- On the maildomain Controls page click the of X MB link in the mailbox Properites entry:

- Enter new quota size in megabytes and click the Submit button.
From this moment on, you will be charged for the difference between this new amount
and the free amount your hosting plan grants. This charge will be added to the recurrent
fee at the beginning of each billing period.
You can't change quota for the postmaster mailbox.
Mailbox Password
Mailbox password is an alphanumeric combination that authenticates logging into the mailbox.
It is required when you are logging into the mailbox outside your control panel or
when you configure an external mail client to access your mailbox.
To change mailbox password:
- Click the e-mail address in the E-mail list on the maildomain Controls page.
- In the MAILBOX section enter a new password in the Password and Confirm password fields.
- Click the Submit button at the bottom of the form.
Discarding All Incoming Mail
If you don't need ALL your incoming mail, you can configure your mailbox to discard all incoming mail.
In this case senders won't receive 'undelivered mail' notifications.
- Click the mailbox e-mail address in the E-mail list on the maildomain Controls page.
- In the MAILBOX section check the Discard All Incoming Mail box.
- Click the Submit button at the bottom of the form.
Signing into a Mailbox
To send and receive mail from your mailbox you should sign in. This can be done from your control panel by
clicking the Launch Webmail icon in the Properties column:

Provided you signed up for a Unix/Linux plan, you can also sign into your mailbox from outside your control panel by
entering https ://YOUR_WEB_SERVER_IP in the Address field of your browser and clicking the IMP-mail client link on the
page you are taken to.
|